Showing posts with label Flipped Instruction. Show all posts

Tuesday, March 12, 2019

Kickin' It with ClassKick

Classkick.com is a site that has been on my to-do list for quite some time.
Image result for classkick
It is a way to deliver asynchronous content to your students so they may guide themselves through something as simple as an exit ticket, to something as complicated as an entire slidedeck with embedded activities.

Students can write, draw, type, use manipulatives, add images and even.....
- Anotate a worksheet! 
- Record their thinking with an audio recorder!


The teacher dashboard shows you at a glance where each student is located in his/her work.

It even has a feature that allows the student to raise his/her hand letting you know he needs help!  The teacher can then go over and assist the student, or help him via a chat/feedback conversation that wouldn't draw attention to a student who is embarrassed to get help in front of his peers.

Despite all of these features I hesitated to introduce Classkick as it seemed as if it was a lot of work on the front end with lesson design. Until I found out that...

  You can upload multiple page PDFs!   
Finally, an answer for all of our TpT junkies :-)! 

As a sample, I have created a Classkick assignment that highlights many, but certainly not all of its features.

Join in as a student and see how you like it!

Go here to get started!  https://app.classkick.com/#/login/OK2Z7H


Teacher overview: 

- See where each student is working. 
- See results of auto-graded questions
- Easily grade finished slides. 
- See which students have their "hands raised"


You can even give stickers that award different point values and come with custom feedback!  


This is certainly an elementary example, but can be used for MS & HS just as well.   
I cannot wait to try it in Spanish class, especially with the easily embedded audio recordings for fluencies! 


Check out this video to see how I created the April Morning Work Classkick assignment! 

Or, view this video to see the awesome features of the teacher dashboard to view student progress in real time! 


Tuesday, December 11, 2018

Cultivating Curiosity with Technology

"Good Morning class.  Today you will learn _____________________________."


-  to identify and apply the Pythagorean Theorem
-  to name key people involved in the American Revolution
-  to determine the main idea of a text
-  to explain the rock cycle

Identifying learning goals and student objectives is certainly a "must-do" in our lessons.   Students benefit from knowing the target for learning.  However, for me, when a lesson starts with the objective followed by direct instruction, we have crushed a great opportunity to prepare the brain for learning.

Curiosity.

Curiosity can prepare the brain for learning.  Giving students opportunities to question and gather tidbits of information related to the upcoming lesson can help to build file folders in their mind where new information can be sorted, stored and connected to previous knowledge.

Explore. 

Most of you already know that I am a HUGE fan of HyperDocs.  (Bought the book, took the course, got the certificate, presented it at PETE & C, etc)  HyperDocs are a great way to start packaging blended lessons to guide you and your students through the learning process.  One of the reasons I love HyperDocs is that they are a reminder of how pedagogically we should be developing our instruction in each lesson or unit plan.  Click HERE to see a template. 


Now this post is specifically inspired by the 2nd phase of the Basic Hyperdoc Lesson Plan: EXPLORE.  And, before I begin, I want to point out how EXPLORE comes before EXPLAIN.  Yes! Students need time to explore the topic and develop questions and curiosities and activate what it is that they already know before you teach it.


"Curate a collection of resources (articles, videos, infographics, text excerpts, etc.) for students to explore a topic. "


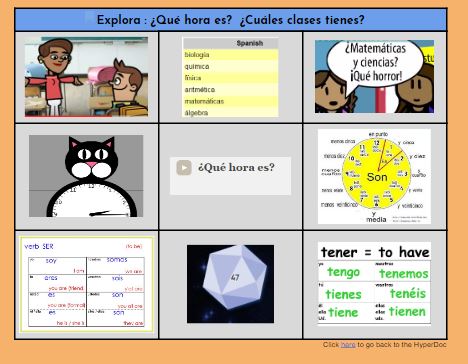
A collection of resources. By having a collection you are now embedding student choice and differention in the exploration process!

*please note you do not have to use a HyperDoc lesson to incorporate "explore" into your teaching

Explore: Multi-media Text Sets (MMTS)

- Gather a list of online resources related to your topic.  Include a variety of means for input.
  • Web Articles
  • Videos
  • Audio
  • Infographics
  • Tutorials
  • Images: Artwork/Photographs
  • Flashcards
  • Games (e.g. Quizlet/Gimkit)
- Prepare the links in a Google Doc

  • Create a Table 
  • Use Image Thumbnails to increase curiosity
  • Highlight text or image > Ctrl K > Create Hyperlink
- Define parameters
  • How many of the options should each student explore? 
  • Should they do one from each row?  

- Design a Reflection Process
  • How will the students record and share their new findings and curiosities? 
    • Class or Small Group Discussion
    • Google Form
    • Google Classroom Question
    • Padlet
    • Notes on the MMTS itself
- Deliver

  • Post to Google Classroom,or use a QR code 
  • Decide when / how you can create time for your students to "Explore"
    • after an assessment from the previous unit
    • small group work after your lessons "hook"
    • HW a few days out before the start of a lesson
- Reference & Reuse!
  • Be sure to get the most out of your MMTS use the resources in your lessons!  After the content is "explained" they will be looking at the resources through a new lens.
    • Send students back to resources based on Formative Assessment
    • Use games to review
    • Use images & video to spark writing prompts
    • Part of a differentiated station rotation


Interested in adding MMTS and/or learning more about HyperDocs?   Contact me to schedule a series of visits.  
In 2 or 3 visits we can have you up and running with an MMTS and/or HyperDoc for a new lesson in the new year! 

 jtamburlin.youcanbook.me or jtamburlin@smasd.org 


Tuesday, March 6, 2018

Explain Yourself.

Image result for screencastify

Screencastify Lite Chrome Extension

Ready to take your tech integration up a notch?   

Move into the deeper end of the SAMR pool of tech integration by incorporating screencasts into the teaching and learning that happens in your room. 


Screencasts are video/audio recordings of your desktop.  The Screencastify Chrome extension allows you to easily take and share videos of this type.  (Scroll down for the how-to's)


Top Tips for Teacher-made Screencasts


#1 Remediation / Flipped Instruction 

#2 Teach the Tech / Formatting

#3 Give Video/Oral Feedback while reviewing work


Top Tips for Student-made Screencasts


#1  Explain the thought-process while solving a problem

#2 Narrate a Google Slides or other Presentation

#3 Dub a video with new language/narration


Teacher-Made: 

  • Remediation 
    • Make a video to re-explain tough concepts.
    • Put this video in a Google Form or an EdPuzzle to check for student understanding.
      • Did you know? Google Forms can send students to a remediation video if they select the incorrect answer.  
    • Use the video as a must-do before retaking an assessment.

  • Flipped 
    • Record your teaching and assign it to students before you teach it in class, or even have them watch during class. 
      • Give checks for understanding,  then differentiate the lesson for those who need remediation vs those who require a challenge. 

  • Teach the Tech / Formatting
    • When giving a digital assignment, most students can figure out the tech.  So, why waste valuable in-class time teaching it?   Post a quick how-to screencast to demonstrate the tech and/or formatting of your project.   
      • No time?  See if your tech coach has one to lend you ;-)

  • Feedback
    • Record yourself while reviewing a student's work.  Allow them to hear your feedback for each section as you show it with your mouse.  Works great for projects that don't offer a comment section. 

Student-Made: 

  • ANY OF THE ABOVE !  
    • That's right! Have a student create any of the above resources instead of doing it yourself.  Perfect for the student that finishes earlier than others, is tech savvy or simply needs a challenge.

  • Explain Yourself 
    • This is the $$$ maker!  Whether it is math problem or a project, try at least one time this year to have your students record their thinking over their assignment.
      • Instead of doing 10 math problems.... 
        • Do 3 !  Have the students record themselves doing one of the problems and thinking out loud. 
          • Put all the videos in a Google Slides for the class to share
            • Teacher puts feedback in the "speaker notes"
      • Project Explination
        • Have the students submit a video of their project going over what they did.  You will be better able to give feedback when you hear the justifications for their choices. 


  • Narrate Google Slides 
    • Instead of presenting 1 at a time during class....
      • Have each student record himself talking over his presentation
      • Post these presentations for the entire class to see 
        • Padlet
        • Google Slides
      • Give students the task of offering thoughtful feedback to 3 presentations

  • Dub a Video 
    • Synthesize information!  Raise DOK levels by having students create dialogue over a video
      • Find a video on YouTube, mute the sound and talk over it
        • Great for World Languages
        • Retell literature with a twist
        • Recreate historical scenes


Or Click HERE to see a Screencast of the above presentation.

How can you (or have you) used Screencasts in your class? 

Comment Below!