Showing posts with label Chrome Extensions. Show all posts

Tuesday, September 24, 2019

Toby Tab Collections

Want to save hours a week?   Check out Toby for Chrome!


This summer while attending some online meetings for my graduate classes, I noticed that my instructor had a super-organized home screen.  He had links to websites, presentations, worksheets, etc categorized by the courses he taught, including his HS Biology courses. 


Toby is a Chrome Extension, that creates a homepage for you where you can save and organize frequently used tabs. Save them by course, unit, or lesson!  Also, this screen will follow you from classroom, to classrom, Surface to home computer, etc.  Never be anywhere without your links! Sound interesting click HERE to try it out!

Need more convincing?  Join me on this tour of how I use Toby from day to day, as well as see how to build, edit and move a collection.  I promise the investment is worth the returns with this one!


Tuesday, September 10, 2019

Write on that site!

Most of us here at SMASD are working with ActivBoards and pens to project and teach.

When it comes to writing out notes & examples for our students with the pen, 
we head to ActivInspire for our digital whiteboard. 


But, what happens if we want to annotate a resource that is on the web, 
in a tab in our Chrome browser? 

#1 You have the option to "Desktop Annotate" within ActivInspire
  • Pros: 
    • Availablity of  the entire ActivInspire toolbar
    • Easy to switch back to ActivInspire when finished annotating
  • Cons: 
    • ActivInspire must be open
    • The pen marks do not "scroll" with your webpage


--------------------------------------------------------------------------------------------------------------------------

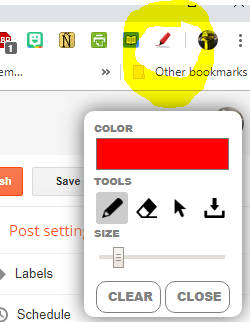
#2 Install "Page Marker" Chrome extension
  • Pros: 
    • Get a pen, without leaving the browser
    • Easily save/download your annotations as an image 
      • for any student needing a copy of notes, Google Classroom, or for your records
    • Annotations will scroll with you on most webpages.
  • Cons: 
    • scrolling not available for Google Docs
      • work around File > Publish to the Web > Open url


Page Marker certainly isn't a tool I use everday, but it is nice to have in your back pocket for a quick note while teaching, demo-ing, creating tutorials etc.


What tricks have you found when teaching to quickly markup your screen? 
Let us know in the comments below! 


Tuesday, December 4, 2018

Control your Tabs!

More than ever, as teachers we are opening tons of tabs a day in Google Chrome.   

By lunchtime our browser can look like this...


Upon entering a classroom in the morning the average SMASD teacher probably has any to all of the following tabs open:

  • PowerSchool
  • Google Drive
  • ClassDojo 
  • Google Classroom
  • Google Calendar
  • Google Slides
  • Quizlet/Kahoot
  • Gmail

+ More depending on your content area and your lesson plans for the day! 

Opening & managing all these tabs can be frustrating and time consuming. 

In today's  Tech Tuesday, I want to show you how I manage my tabs with 3 clicks: 

- One Tab Chrome Extension

- Pin All Tabs Chrome Extension

- Close all tabs to the right / Close all other tabs


Check out this video tutorial to see how you can open all the tabs you need in the morning in 2 clicks! 


Click HERE to get the OneTab Chrome extension. 

Click HERE to get the Pin All Tabs Chrome extension. 


Want a one-on-one session to help you set your tech goals? 

acatalone@smasd.org
avollmer@smasd.org


Tuesday, March 6, 2018

Explain Yourself.

Image result for screencastify

Screencastify Lite Chrome Extension

Ready to take your tech integration up a notch?   

Move into the deeper end of the SAMR pool of tech integration by incorporating screencasts into the teaching and learning that happens in your room. 


Screencasts are video/audio recordings of your desktop.  The Screencastify Chrome extension allows you to easily take and share videos of this type.  (Scroll down for the how-to's)


Top Tips for Teacher-made Screencasts


#1 Remediation / Flipped Instruction 

#2 Teach the Tech / Formatting

#3 Give Video/Oral Feedback while reviewing work


Top Tips for Student-made Screencasts


#1  Explain the thought-process while solving a problem

#2 Narrate a Google Slides or other Presentation

#3 Dub a video with new language/narration


Teacher-Made: 

  • Remediation 
    • Make a video to re-explain tough concepts.
    • Put this video in a Google Form or an EdPuzzle to check for student understanding.
      • Did you know? Google Forms can send students to a remediation video if they select the incorrect answer.  
    • Use the video as a must-do before retaking an assessment.

  • Flipped 
    • Record your teaching and assign it to students before you teach it in class, or even have them watch during class. 
      • Give checks for understanding,  then differentiate the lesson for those who need remediation vs those who require a challenge. 

  • Teach the Tech / Formatting
    • When giving a digital assignment, most students can figure out the tech.  So, why waste valuable in-class time teaching it?   Post a quick how-to screencast to demonstrate the tech and/or formatting of your project.   
      • No time?  See if your tech coach has one to lend you ;-)

  • Feedback
    • Record yourself while reviewing a student's work.  Allow them to hear your feedback for each section as you show it with your mouse.  Works great for projects that don't offer a comment section. 

Student-Made: 

  • ANY OF THE ABOVE !  
    • That's right! Have a student create any of the above resources instead of doing it yourself.  Perfect for the student that finishes earlier than others, is tech savvy or simply needs a challenge.

  • Explain Yourself 
    • This is the $$$ maker!  Whether it is math problem or a project, try at least one time this year to have your students record their thinking over their assignment.
      • Instead of doing 10 math problems.... 
        • Do 3 !  Have the students record themselves doing one of the problems and thinking out loud. 
          • Put all the videos in a Google Slides for the class to share
            • Teacher puts feedback in the "speaker notes"
      • Project Explination
        • Have the students submit a video of their project going over what they did.  You will be better able to give feedback when you hear the justifications for their choices. 


  • Narrate Google Slides 
    • Instead of presenting 1 at a time during class....
      • Have each student record himself talking over his presentation
      • Post these presentations for the entire class to see 
        • Padlet
        • Google Slides
      • Give students the task of offering thoughtful feedback to 3 presentations

  • Dub a Video 
    • Synthesize information!  Raise DOK levels by having students create dialogue over a video
      • Find a video on YouTube, mute the sound and talk over it
        • Great for World Languages
        • Retell literature with a twist
        • Recreate historical scenes


Or Click HERE to see a Screencast of the above presentation.

How can you (or have you) used Screencasts in your class? 

Comment Below!


Tuesday, November 14, 2017

Save to Google Drive...With the Click of a Button!

The Save to Google Drive extension can be easily installed and used if you want to quickly grab information from a Google Chrome tab on the internet, and don't want to have to copy/paste that information into a new document. 

This little extension takes a screenshot of the current Chrome tab and saves that data in one of the following formats:
  • .png
  • .html (source of the page)
  • .mht (web archive)
  • Google Doc
*It also will allow you to save .pdf files directly to your Google drive.

Installing Save to Google Drive
  1. Open Chrome.
  2. Navigate to the Save to Chrome extension page.
  3. Click ADD TO CHROME.
  4. When prompted click Add Extension.
  5. Allow the installation to complete.
Configuring Save to Google Drive
Right-click the small Google Drive icon to the right of your Chrome address bar and select Options to configure the extension. From the Options page, you can set the following:
  • The Save To location for Google Drive (it will default to the root of your Google Drive)
  • Save As file format (.png, .html, .mht, or Google Doc)
  • Convert saved link to Google editor format

Using Save to Google Drive
Save to Google Drive is simple to use. When you're on a page you want to save, left-click the extension icon and the file will be saved. A popup window will appear, giving you the chance to rename or delete the file.

Tuesday, March 1, 2016

Quick and Easy Formative Assessment

As teachers, we're always looking for ways to make sure our students are on track. We wonder things like "Is everyone getting this?" or "Do I need to review a bit more before moving on?" Enter Plickers...a free and easy-to-use hybrid of QR codes and response devices. The nice part about Plickers is that the only technology you need is a single classroom computer and a single mobile device.

According to 5th grade teacher Shannon Eckels, who recently started using Plickers in her classroom, “It’s a fun way to use technology as a formative assessment. My students love getting out their Plicker cards and getting scanned to see if they’re right. It is also super easy for the teacher to add questions quickly.”

Plickers is similar to handheld clicker systems some of you may be familiar with. This is where students respond to multiple choice questions by clicking the letter of the correct answer, and the resulting data is displayed for the teacher.  With Plickers, there is no need for the expensive devices. Each student is assigned a Plickers card with a unique pattern, and he or she uses the same response card all year to answer questions asked by the teacher. The students respond to a question by holding up their cards, and the teacher scans the cards with a mobile device (smartphone, iPad, etc.). The results appear instantly for the teacher to view. 


To understand how it works, take a look at the sample Plickers card below. The number on each side is the number assigned to the student in the system and each card has its own unique pattern that the system recognizes. Students respond to Plickers questions by holding up their cards and rotating them so that the correct answer is at the top. 


The teacher scans the cards all at once by using the camera on a mobile device and sweeping it around the room. As the system recognizes each card, the results are displayed instantly on the teacher's mobile device.


You can download a set of these cards for free from the Plickers website. Laminating them might be a good idea for durability, but you should laminate one and try it out first. Sometimes the glare from the plastic can cause problems with scanning. You'll also need to download the Plickers app on your device either through iTunes, or Google Play.

Teachers can create a library of questions and correct answers that can be used with any of their classes. You can display questions in full screen mode from the Plickers website, or read them aloud to students. 

Here are a few ways you can start using Plickers now:

 ·         Use Plickers to find out what your students know about a topic or skill before you introduce that lesson or unit. You can save a lot of instructional time by determining the appropriate level of instruction in advance.

 ·         Plickers can be used as formative assessment during a lesson. If your students are not grasping the concepts, it’s far easier reteach those concepts that day rather than to attempt to correct confusion the next day. 

 ·         After completing a lesson, assess students with a series of Plickers questions. You can use this as a type of exit ticket. You can view the results immediately or save them for later as you plan the next day's lesson to make sure the level of instruction is appropriate. You'll also know who's going to need extra help.


If you need help getting started or have any questions, please contact a tech coach! Happy Plickering!