Although the official week for Hour of Code is over, the fun doesn't have to stop there! It was amazing to see students who are rarely engaged in their learning begging for just another minute to work on code. I have heard rave reviews from both students and teachers who participated in this event, so why not keep the momentum for computer code going? In addition to the resources that can be found on the code.org website, there are dozens of resources available for all different types of experience levels. Many of these resources have free student accounts available, so students can save their progress.Here are just a few:
If you'd like to learn more about coding and how you can use it in your classroom, there is a growing number of resources for this. Edutopia has a collection of articles and discussions about Coding in the Classroom that you can find here. Edudemic also has a collection of resources for teachers entitled "Coding in the Classroom: 16 Top Resources."
If you're still not convinced, check out this infographic from Kodable:
Did your students try the Hour of Code? If so, please comment below with your thoughts. As always, if you have any questions or need help getting started, please contact a tech coach.
I use Google Classroom to quickly and seamlessly push out announcements, websites, files, surveys, tests & discussion questions. It makes collection of digital files effortless and subplanning a breeze from any computer anytime, anywhere.
The students like it because they can use their devices, it syncs with their calendars, and they can submit files without being logged onto a school computer. Grades and comments can be set to pop up as notifications on their phone or iPod. In addition, there is the option of posting questions to the stream when something is unclear.
Teachers in our district across all disciplines are already taking advantage of this EASY to use tool. Google keeps it simple, and that is why it works.
SMASD Departments with current Google Classrooms are:
- Science
- ELA
- Music
- Computer Programming
- Foreign Language
- History
- Health
- Extracurriculars
Keep in mind that you aren't limited to Google file types.
Any file or link can be distributed and collected through Classroom!
For this weeks post, I have decided to post links to some helpful "cheat sheets" that I got from the Custom Guide website. These sheets provided a lot of information from - parts of the screen, shortcut keys, and specific instructions for many basic, fundamental commands. Please take the time to check out these links for the programs that you use the most. I think you will definitely find them beneficial!
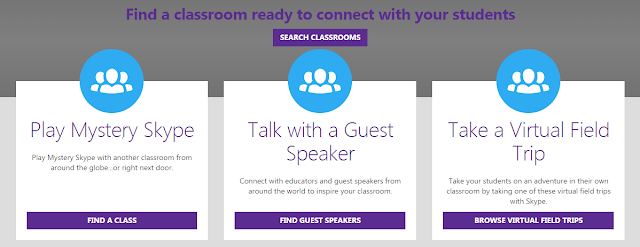
Chances are that your students will never get to take a field trip to Antarctica or have a Holocaust survivor visit the classroom. However, you can still bring these kinds of experiences to your classroom through Skype. Skype is an application that can be used to connect to others using live video and audio on a computer, tablet, or iPad. This tool can be used across all grade levels and subjects and the best part is that it's free and easy to use. Teachers can plan to take virtual field trips, talk to experts, and collaborate with other educators from all over the world.
The first step is to create or log into an account by visiting this link: https://education.microsoft.com/ If you already have any kind of Microsoft account, you will be able to use that log-in. If you need help getting logged in or creating an account, please contact a tech coach!
Here you'll have several options for how you'd like to search based on the way you plan to use Skype in the classroom:
Play Mystery Skype: This one is my favorite! Classrooms from around the world pair up and try to figure out where the other class is located during the Skype session. Students learn about asking strategic questions, geography, other cultures, mathematics, and more and they get to take charge of their own learning! Check out the video below to see a Mystery Skype session in action.
Talk with a Guest Speaker: You can find an expert or other educator who will speak to your class through a Skype session. This could be anyone from an author to a historian to a scientist in Antarctica! You can search for speakers based on the age group and subject you teach and bring the experts right into your classroom!
Take a Virtual Field Trip: One of the best parts about the Skype Virtual Field Trips is that they're free! You can visit zoos, museums, other countries, and more. Again, you have the option to search by age group and subject.
Skype is a great tool for collaborating on exciting projects with educators all over the world and it makes learning memorable for your students. You can also search lesson plans on the Microsoft in Education website to see additional ways educators are using Skype in the Classroom.
If you have any questions or would like help setting up a Skype session for your classroom (you'll need access to a microphone and webcam), please contact one of the tech coaches. If you've already experienced Skype in the Classroom, please tell us about it in the comments below!
Ever wonder how they make tutorials on YouTube where the video shows a screen of what you are doing on the computer with integrated narration?
It is called Screencasting.
Ways to incorporate screencasting into your classroom:
Live Screencasts - for flipped classrooms and review videos
Record your presentation as you teach it. Post it for a review that the students can access or save it for next year and try "flipping" your classroom for a unit or two. No out-of-class time required on the educator's part.
Students who miss class -
If you know there will be many students out for a school trip, or if you have students in programs such as Crossroads, it can be very time consuming attempting to write out your explanations of concepts and/or directions. Create a screencast to save time and promote comprehension.
Sub Plans -
If you want to keep your class on track while you are away. Record a presentation of the lecture or notes. Also explain any assignments so that you are sure your class gets the message.
Student projects -
For large classes, it can be time-consuming to have everyone present their PowerPoint or Google Slides show to the class. Rotate who gives their presentation live and who screencasts it with each unit project.
Peer tutoring videos -
Have your advanced students create tutorials that you can post on a platform such as Google Classroom. It perhaps would be motivating to hear it explained from a peer.
Digital Grading -
Assess student presentations and projects by creating a screencast where you offer audible commentary and feedback.
Co-worker assistance -
Use screencast to show a member of your department how to use one of your wonderful ideas.
Screencastify is a Free Google Chrome Extension.
It is easy to install.
I made a quick screen cast to show you how to get the extension and how to set your microphone and settings.
Once your have the extension and your settings ready to go, you can do your first Screencast.
Here is a Screencast showing you how to create a screencast...
Here is a screencast of one of my Flipcharts. (I will speak in English for you! Well ... a little bit.)
And finally a screencast of what to do once you have finished recording - including where to find it and how to share it.
Screencasting Tip:
* Don't try to make your videos perfect. The software is a one-take system; so you can't edit. If you make a mistake, correct yourself on the video. It just shows that teachers are human too.
How can you see yourself using Screencastify or another screencasting software in your classroom?
Comment below.
Tuesday, November 17, 2015
This week I am going to talk about iMovie, which is an app available on Mac operating systems. With that said, this post is mainly for teachers who have access to ipads in the classrooms. This app allows users to create movies and movie trailers for various types of projects by using video clips, photos, and music.
Students really enjoy using this app because it is fun and exciting to create movies (almost like a game to them) but at the same time they are demonstrating content material they have learned.
Play video to see an example of an iMovie trailer created by elementary students:
Below are some example of how you can use iMovie in the classroom: 1- Create engaging presentations This is probably the primary function of iMovie. Apple designed iMovie in such a way that it becomes next to impossible for any other software developer to beat it. The presentations created by iMovie are highly distinguished and are ideal for classroom teaching. Show your students how to create presentations using pictures, text, and sound and let them experiment with its different features
2- Create How to Videos iMovie can be used for creating tutorials and guides for students.. Teachers can create a how-to iMovie around a concept taught in the classroom and students can then burn it into a disc or load it into an iPod and take it home and practice it with the appropriate instruction. It can also be uploaded into the classroom blog for everyone to access any time they want. This is also a great way to help those students who were unable to attend the class when the concept was taught.
2- Create Video reports Students can use iMovie to create high-quality video reports to demonstrate their comprehension of abstract concepts.
3- Provide out-of school experiences Both teachers and students can use iMovie to document and record events outside of the school and that has relevance to the units being taught in the classroom e.g., field trips . These iMovies can be brought to the classroom and shared with the whole class.
4- Use iMovie for classroom projects Using iMovie in classroom projects is a great way to promote a culture of collaboration and co-operation among students. They can work in groups to create iMovies that includes text, photos,and sound to represent their projects. While watching works of others, students can have the chance of giving feedback to their peers.
5- Digital story telling Students can use iMovie to tell stories using digital media including pictures, images, and music. This can improve their verbal fluency and their communicative skills.
6- Create book trailers/reports Students can use iMovie to create engaging book trailers and this is how they can do it:
Read a book
Create a summary of the book
Plot summary on story board
Select images to match student writing
Use iMovie to create book trailer
Enhance it with music and transitions
Below is a trailer created as a wrap-up and reflection project for an in-class skit based on a short story that we read.
I was first introduced to the Hour of Code during its inception in 2013. Computer coding/programming was not something I was familiar with, but trying it out for an hour with my 5th grade students seemed like something that would be easy enough to do. Not only were my students and I instantly hooked, but coding has become one of my favorite ways to integrate technology into the classroom!
The vision behind the Hour of Code is that every student in every school should have the opportunity to learn computer science. One week a year is dedicated to encouraging students, teachers, schools, and districts to give computer programming a try. Check out this brief video from Hadi Partovi, the mastermind behind the Hour of Code and developer of code.org:
The organizers of this event have compiled a wealth of resources and coding activities that are appropriate for students from kindergarten through high school. No experience necessary! These activities are truly meant to take just one hour, but if you're short on time, they can be tailored to fit your needs. Worried about devices? There are Hour of Code tutorials that work on PCs, smartphones, tablets, iPads, and some that require no computer at all. Even though you may not be a computer science, math, or technology teacher, coding may still be something you can incorporate into your classroom. Some compelling reasons to integrate coding include helping students develop and strengthen:
problem solving skills
logical thinking
collaboration
creativity
perseverance
and learning that it's okay to fail
Additionally, it is estimated there will be more than one million computing jobs available by the time the year 2020 rolls around. Why not help our students get a jump start on their futures and be ready to take their place in a 21st century world?
Mark your calendars! December 7-13 has been designated as the week to try an Hour of Code with students. If you can't do it during that week, feel free to introduce code to your students at any time. The idea is just to give millions of students an introduction to computer science and to show them that anybody can learn the basics! If you're interested in participating, you can visit the Hour of Code website to register and learn more: https://hourofcode.com/us (There are prizes for every event organizer and participating classrooms have a chance to win even bigger prizes!)
Eduspire, a continuing education company, is offering a free webinar focused on the Hour of Code. It will take place November 18th from 7-8 pm. If you read this blog post and thought to yourself, "There is no way I can teach programming," or if you're just itching to learn more, maybe this free webinar is for you! Click here to register or here for additonal details.
What happens after the Hour of Code, when you and your students want more? Beyond the Hour of Code will be an upcoming blog post with more coding/programming resources.
If you have any questions, please feel free to e-mail a tech coach. Thoughts on how you might incorporate the Hour of Code into your classroom? Please post a comment below!
A few weeks ago, I came across the lesson plan that said:
Formal Assessment: Timeline depicting Cuba's history from Columbus' Arrival - Present
Timelines are a famous teaching/assessment tool. However, for me their organization and presentation was always cumbersome. Students had posters as long as your chalkboard with writing as small as chalkdust.
The dates were the focus instead of what actually occured.
Once technology rolled in, timelines still remained awkward with broken PP links and motion-sickness causing Prezi's that made it difficult to see the "big picture". Even still we were limited for some time to: dates, text and pictures. All this requiring at minimum a week in the computer lab. Now hstry.co provides a simple click-and-add platform that requires little to no training to use. Easily embed text, pictures, audio, questions, video and more. All while logging in with your smdutch.net account or through Edmodo. Click here to see an example I made for SMASD teachers. (displays one example of each item that can be added to a hstry.co timeline)
Finally don't forget that hstry.co timelines are great ways to present information to your class. Don't want to reinvent the wheel? Search, copy and/or edit an existing timeline. See this timeline that teaches "Determining the Main Idea" in a story. Timelines aren't just for history teachers anymore. Comment below with a way you think you could use hstry.co timelines in your class.
It is a real-time image capture
devices for displaying an object to a large audience. Like an opaque
projector, a document camera is able to magnify and project the
images of actual, three-dimensional objects, as well as transparencies. They
are, in essence, high resolutionweb cams,
mounted on arms so as to facilitate their placement over a page. This allows a
teacher, lecturer or presenter to write on a sheet of paper or to display a two
or three-dimensional object while the audience watches. Theoretically, all
objects can be displayed by a document camera. Most objects are simply placed
under the camera. The camera takes the picture which in turn produces a live
picture using a projector. Different types of document
camera/visualizer allow great flexibility in terms of placement of objects.
How could I use it in the Classroom?
Real Time Video Projection –Teachers can demonstrate/show a procedure to the class using the document camera and project it on the board.
(Ex: Science lab demonstrations, art demonstration, etc.)
Essay Papers – The teacher can place handwritten essay papers
submitted by children under the scanner and review it out loud so that
everyone can learn together.
Dictionary Skills – This device can also be used to
enhance spellings in the classroom. The teacher can place an actual
dictionary under the camera allowing the students to be involved in the
process of locating words, understanding their meaning and learning the spelling
Whiteboard – Instead of using a whiteboard, the
teacher can put a paper under the camera and write on that instead.
Reading/History –Teachers can use this technology to share a book in a group reading
session. The book can be placed under the camera and projected on the
screen to allow everyone to see it. This ensures that everyone is on the
same page, literally.
Document Projections–Teachers can project a page of any book or paper to share with the class
See Video:
Where can I find one?
There is a document camera available in each building. **See your technology coach about using it in your classroom.