Tuesday, December 20, 2016

Rethink Google Slides


Google Slides aren't just for presentations anymore!

Go through the presentation above to find out more or click here to open the presentation in a new tab.

Have an idea for using Google Slides in your class?  
Contact a Tech Coach to help you get the ball rolling!

Monday, December 12, 2016

ActivInspire connects with Classflow


Remember these guys? 
Image result for activexpressionImage result for activoteWow! They were really the cat's pajamas! 
Image result for cat's pajamas


But now, their batteries are dying, kids don't remember how to text with a number pad, etc... 

So how do we gather feedback from our students with all these fantastic flipcharts we already have? 


This button right here should be at the top of your ActivInspire Flipchart.  
(If not, let a techcoach know you need updated!)

Go ahead!  Click Connect!
Now just click the "G" to sign in with your @smdutch.net account!


Here comes the money!  Your class code.  Best part - it NEVER changes!  So, make that poster for your classroom that says: 

classflow.com/student 
> Join
> Q9772 (use your unique class code)

*Students do not need an account & you don't have to pre-prepare anything!

Image result for activinspire expresspollAll the student needs is a device with the Internet and you are in.  

Use your Express Poll button to send out these types of questions on the fly.  No prep needed.

- Multiple Choice
- Text Response
- Numeric Response
- Sort in Order 
- True / False 

Image result for activinspire expresspollStudents will receive a copy of your slide with a place to submit an answer.  All the data comes to your flipchart with an immediate pop up graph of responses.  

AND - as if there couldn't be more - the responses are stored in a separate page at the end of your flipchart for you to reference later for individual data collection.  

Unique ideas I used last week

- Send the slide to your students to take notes without squinting to see the board.  Send them a Yes/No question to find out when they are finished copying.

- Instead of sending students to the board to go over answers, have a representative from each group send their answer to the board as the response to a text or numeric question.

'Tis the season to RECEIVE!  Contact a techcoach for a demo before break!


Tuesday, December 6, 2016

Give Googley Feedback

You've done it!

  • You've made your Google Classroom.
  • You're students are in it.
  • You have created an assignment.
  • Submissions are rolling in....
Now what?                                                                      


Sure you can print them, but why?  Then you just need to lug your papers back and forth like you always had.  Put that Surface to work for you and join me as I show you ways to assess a Google Doc (or Google Slides) submitted by a student.
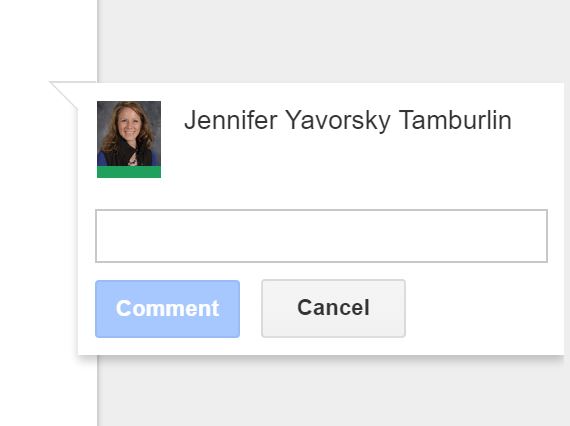
Commenting:
What does it do? ~ It leaves a comment for the reader in the margin of the doc.
     
How do I do it?  ~ Put your cursor on the word you want to comment on or highlight the text.  
            Hit Ctrl+Alt+M. Type your comment in the box and then click Comment.


     Tip #1: If your students are revising their work, tell them NOT to click "Resolve".  This way you can decide if the correction was adequate and get through your final copies faster.
     Tip #2: Use the comment box to provide resources that will help them fix their error.  Copy a web address to direct them to notes or a tutorial.
Tip #3: Copy and paste your rubric at the end of the student's doc.  Then comment, giving feedback  on the box/score/level he achieved. 


Suggesting: 
What does it do? ~ It adds a suggestion directly into the text of the document.  Letting the author know what you think it should be.

How do I do it? ~ Click the "Editing" button in the upper right hand corner of your doc.  Change it to       "Suggesting" mode.  Highlight the text that you want to replace and begin typing.  The       highlighted text will have a strikethrough appearance and your text will be there between brackets.

Tip #1: Please note that the student will simply have to accept or reject the suggestion for it to take effect.  The original author does not have to type in the change himself.  Therefore this may be a better tool for students to use with each other on a group assignment, leaving commenting the tool for a teacher to guide a student to improving his work.


Returning Grades in Google Classroom: 
What does it do? ~ It gives you a place to store your grades for the assignment until you are ready to put them in PowerSchool.  Seemingly taking place of a paper gradebook.  You can view the grades for each of your Google Classroom Assignments individually, or you can view all the grades for that class in a spreadsheet.

How do I do it? ~ Click on the assignment in Google Classroom.   Change the total points at the top.  Add your grades in as you evaluate each student's work.  (Don't forget to return the grade to the student with any comments you have).  Click the gear in the upper right to see a spreadsheet of all of your Google Classroom grades for this class.  Copy them to PowerSchool periodically.

Tip #1: At this time you can't put in 1/2 points.  It will round the number up.  
Tip #2: If students have the Google Classroom App, they will get your grades and comments as a notification on  their ipod, tablet or phone.  This greatly improves feedback speed as well as submission of redos.
Tip #3: You can give individual comments as well as group or whole class comments when returning a grade/assignment.

       What tricks do you have for giving digital feedback to your students?  Comment below!

Tuesday, November 8, 2016

Throwback to Hour of Code

Almost exactly a year ago, we first mentioned the Hour of Code on the blog. This year's event is scheduled from December 5-11, which is right around the corner! Check out the featured post for more details on this global event and if you're interested, sign-up at the following link to participate in the Hour of Code this year: https://hourofcode.com/us#join 

Tuesday, November 1, 2016

Looking for Some PioNears

You've been in your students' seats before. You know, the two hour webinar you signed up for to get Act 48 hours that put you to sleep. The speaker who talks and talks and talks and finally starts to sound like the adults from Charlie Brown. It doesn't have to be that way for your students! We are working with 21st century learners whose lives center around technology. Why not bring the technology to them in your lessons and connect with them on a whole new level???  Nearpod is an interactive teaching tool that you can use to create, engage, and assess. (PioNears are those educators who spread the Nearpod love far and wide and help others integrate this technology into their own classrooms.)


Here are the basics of how Nearpod works: 
1. You create (or download-for a fee) interactive lessons.
2. You share your lesson and students can access it via desktops, tablets, smart phones, etc.
3. YOU control the pace of the lesson in real-time.
4. The students interact with the lesson and submit responses as your lesson requires.
5. Formative assessment can be included in the lesson and you can provide immediate feedback.


This quick, one minute video shows a veteran teacher's testimonial of why he chooses to incorporate Nearpod in his classroom: https://vimeo.com/95197111

To get the full effect, you need to see Nearpod in action yourself! Once you create a Nearpod, you'll have access to a free "Getting Started with Neapod" Nearpod. If you have two devices available, use one as your teacher device and log onto the other as a student by going to www.nearpod.com/student
When you start the sample Nearpod on your teacher device, you'll get a PIN to use to access the lesson on  your student device. From there, you will be able to see things from both the teacher and student perspective. Nearpod is an innovative way to incorporate BYOD into your classroom and to keep your students engaged and motivated!

Some things to keep in mind:

  • Students need devices, but the district has given us lots of options: computer labs, BYOD, Surfaces, Chromebooks, iPads and more!
  • You can create and share Nearpod lessons with team members. Divide and conquer the content as you create interactive lessons your students will love!
  • Nearpod will work with any grade level or subject area.
  • There are lots of premade Nearpods out there=less work for you!
If you have an questions, please don't hesitate to ask! If you've used Nearpod before, please share your experiences in the comments below!


Tuesday, October 4, 2016

Let's Recap


What is Recap?

Recap is a free student video response and reflection app developed by the makers of Swivl.  It gives teachers and parents insight into students' learning and progress.  Recap provides evidence of student thinking, improves formative assessment, and supports personalized learning.

How it works


Assign - Create and assign questions to a student, a group of students, or the entire class to be answered during or after a lesson.

Watch - Get an overview of how each class is doing as a group or dig into individual responses for formative assessment.

Share - Share individual responses with other students, parents, or teachers, or show a daily review reel in class.

What do I need to use this in the classroom?

  • Teachers need to sign up online (just need an email and password -- it's free!) *Students do not need accounts.
  • Teachers create your class and add students -- just click "add student" and type their name in -- no password or student numbers needed.
  • Teachers then give students the class code so that they can access their assignment.
  • Students can use a laptop, surface, ipad, or iphone to access the website or app to record their recap -- as long as it has a camera and microphone!) 
  • Teachers can view the recap by logging back in to their recap account on any device with internet.  View all videos at one time. Leave feedback for students. Share the clip via email.


What teachers are saying about Recap


Tuesday, September 20, 2016

Google Forms as Quizzes

Google Forms: 

If you are like me, you have come to love Google Forms.  

Google Forms help me: 

  • Gather parent/student info at the beginning of a course
  • Obtain Exit Ticket data at the end of a lesson
  • Survey and poll the class and faculty
  • Create self-grading assignments for quicker feedback
  • Design flipped lessons
  • Take orders for fundraisers
  • Collect RSVPs for an event

Now Google Forms offers a Quiz feature within the app itself!  (no extension needed)

For multiple choice questions, it is as easy as a mouse click to assign correct and incorrect answers that will be self-graded.

Check out my video as I make a Google Form into a Quiz.  
**Form-pros can start the video at about 1:12 to get straight to the action!**


For those of you accustomed to using Flubaroo as an extension in your Google Response Sheet, I have a link here that provides a comparison of the two options. Scroll down on the page to see an info-graphic highlighting the features of each.


Have you used Google Forms as a Quiz?  Send us your feedback in the comment section below.

Tuesday, September 13, 2016

Google Classroom Throwback Tuesday

In its debut year, the SMASD Techspot hosted 38 posts highlighting the possibilities for technology integration in our classrooms.  That is an impressive foundation for a digital resource library.

Here at Techspot we want you to know that the articles that you didn't have time to read are still available to you.


How to find old posts:

Use the search box in the upper left hand side of the blog.
  • Type in a keyword.
  • Hit "Enter" or Click the magnifying glass.

Browse the new "Index" page. 


  • Second to last tab across the top of the blog.


Visit our Featured Post.
  • Once a month, we will have a Tech Tuesday Throwback.  
  • It will be posted on the right-hand sidebar under "Featured Post".
  • Reminisce and reevaluate to see if this is something that could now work for you! 


This week - get back to the basics with Google Classroom.  See more by clicking the featured post.

Tuesday, September 6, 2016

What's new in Google Classroom?

As the school year begins, it is important to establish effective means for distributing and collecting student work.  Now more than ever this "work" isn't restricted only to dittos we ran off of the copy machine.

Establishing your Google Classrooms now will allow you later to exchange any link or file effortlessly between the teacher and the student from anywhere on any device.  (Also, our new school & teacher webpages will be able to link to Google Classroom for participating teachers.)

But more on the basics of Google Classroom next week....

For those of you Google Classroom veterans, you may have noticed a few new features.

1. INVITE GUARDIANS - Under "students" on any class page you will see the option to add a parent email address.  Upon receipt of the email, parents will have the opportunity to subscribe to Google Classroom summary reports.  

The reports include:

  • Missing Work
  • Upcoming Work
  • Recent Posts
To see a sample report click HERE.

This is an effortless way of keeping parents in the loop with what is happening in your classroom.
I personally am very excited for this option for the dance team.  Think about how it may work for your team or club too.

2. TOPICS - For the avid Google Classroom teacher or student, the "Stream" may get a little crowded or overwhelming when trying to find a post.  This year, when you create a post you may assign it a "Topic" or category of your choosing.   You may choose to categorize by assignment type, unit name or anything you wish. 

  • Choose/create the category when making a post.
  • Click a category on the left to sort your stream.
3. ANNOTATING IN THE APP  - Teachers who have the Google Classroom App on their Android or iOS mobile devices can now annotate over an assignment by using their finger or a stylus on the device's screen.  This is great for math teachers who before were limited by document formatting, as well as language arts teachers who want to circle, underline and draw arrows within text.

For instructions on how to actually write notes on student work click HERE.

4. POLL YOUR CLASS - The "Question" feature is a must-use for short answer assignments.  Now, using the same tool you can do a quick poll of your class, choosing whether or not the class sees the summary of responses.  It's good for exit tickets or to check for understanding.


5. POST TO A LATER DATE  - As of May, teachers can schedule their questions, announcements and assignments to post at a later date.  This would be very useful for the quiz that you don't want released until the class begins.


~Speaking of tests, watch for the upcoming post on how Google Forms can now be self-grading quizzes~


These features were all added due to requests from users like you.  If there is a feature you would like to see added, don't hesitate to send feedback by clicking the "?" in the lower right hand corner.

Go to classroom.google.com to access or make 
your Google Classroom.


Thursday, June 2, 2016

Tech Thank You!

It's hard to believe that the 2015-2016 school year has come to an end. The tech coaches would like to send out a big thank you to everyone who took the time to read the blog, contributed with comments, and/or tried out something new this year. We have some exciting ideas in store for next year and can't wait to share them with all of you. If you have any questions or concerns over the summer, please feel free to e-mail one of us. Have a relaxing and enjoyable summer and we'll see you in the fall!

Thanks again for all you do!
                Angie, Jen, and Amanda 

Tuesday, May 24, 2016

Let's keep it CLEAN, St. Marys...

You clean your desk drawers, organize your filing cabinet and store away decorations.

But, where is digital organization on your list of to dos?

I must admit, I am very much a guilty party.  I had no idea where to begin when it came to digital clean up.  To get to my daily flipcharts I would navigate a maze of folders that I created years ago.  There was little rhyme or reason to the organization.  It was a path that I would spend an hour re-figuring out at the beginning of every year.


 Here are the 5 steps that I have been taking to start the process of digital clean up.  The initial task is daunting.  Once the organization process is established, it will become habit and your digital cleanup will be an ongoing process instead of the obstacle that you try to avoid.


NUMBER 1:  Google Keep .

  • Get the sticky notes off your computer screen.  keep.google.com gives you digital post it notes that follow you from classroom to classroom, device to device, school to home.
  • What a great way to make your to-do lists: 
    • End of year business 
    • Make up exams/work
    • Summer reminders
    • Classroom items you want to look to purchase
    • Things you want to remember for the start of next year
      • (Unlike that post it - the google keep note won't lose it's stick!)


You can even add links, check-off boxes, reminders, and share your notes with others.

NUMBER 2:  Get it in your PBox.


  • Check for files that you may have only saved locally on your machine:
    • Desktop Screen, Downloads Folder, Picture Folder etc.
  • Get these in your PBox asap.  Cut, Copy, Drag and Paste those files into your Y or Z drive to prevent their loss.
Next year: Get in the habit of doing this right away! - Don't wait until year's end.


NUMBER 3: Name those media files.

  • Media files have the tendency to save as generic names: 
    • WIN / IMG
    • the name of your camera
    • the timestamp
    • numerical order
This can make it very difficult to search for the image or video that you are looking for later.

  • You can bulk name your files very easily on your PC
    • Highlight all of the files that you want to rename in the same category
      • e.g.  MacBeth Videos 10th grade
      • 5th grade field trip 2016
    • Right Click and choose Rename 
      • it will seem like you are only renaming one file
    • Hit Enter
All of your files are now renamed "MacBeth Videos 10th grade (1, 2, 3, 4, ...)" 
"5th grade field trip 2016 (1, 2, 3, 4....)


NUMBER 4: Delete and Organize.

To find unused files: 
  • Open your PBox or any file within your PBox.  Click the Date Modified header to sort your files from oldest to newest.

  • Use your judgement... here I see I have files that have not been modified or opened since 2003, I am guessing those can go.... 
    • Hold Crtl as you clik through the ones you want to delete and then delete them all at once.
  • If you are worried about permanently deleting files, try making a folder called Old Files and keeping them there for another year, to see if you actually will access them.
To create folders: 
  • Right Click anywhere in your PBox.
  • Hover over New then click Folder
  • Find a filing system that works for  you.  I use a style similar to that of my actual paper filing cabinets.
  • Then Drag, Drop, Cut, Copy and Paste your way to a better organized drive.


What is Archiving?

  • Google Classrooms will appear in students' lists of classes until they are Archived by the teacher (or the student removes him/herself from your class)
  • Archiving a Classroom: 
    • Preserves your posts, assignments etc.
    • Removes them from your active classes screen, for organization
    • Gives you access to the posts, for reuse next year
    • Does not allow you or a student to further modify the class
    • Still allows you the option to restore the class if you need to reuse/modify it for any reason
How to Archive: 


  1. On the class card, click the dots and select Archive.
  2. To confirm, click Archive.


What tricks do you have for tidying your digital world?

Wednesday, May 18, 2016

NeoK12

At NeoK12, they believe that kids learn best when they see how things work, when, where, and why they happen.  Watching educational videos is a great way to learn because it allows kids to build a visual picture or model in their mind. The visual dimension not only helps them understand concepts better, but also stimulates curiosity and encourage self-learning.  Go to http://www.neok12.com/ to check out the topics available!

NeoK12 also features innovative tools for learning and teaching.
      These include:

Tuesday, May 10, 2016

Genius Hour!


Once again, I am hitting a topic that may not directly be a tech tool, but that will more than likely incorporate technology somewhere along the way. I thought this would be a good post to leave you with for the year to give you time to think about implementation next year. 

I first heard about Genius Hour last year when I was teaching 5th grade and I was intrigued by the idea. As the definition above states, Genius Hour is adapted from Google's 20% time idea. Founders Larry Page and Sergey Brin highlighted the idea in their 2004 IPO letter: "We encourage our employees, in addition to their regular projects, to spend 20% of their time working on what they think will most benefit Google," they wrote. "This empowers them to be more creative and innovative. (Side note: Gmail was created during a 20% time project!) During Genius Hour, students have a chance to pursue their passions and creativity and innovation are encouraged. Each student develops a big question focused on a topic he/she would like to explore further. They take the time to research about their topic and then plan a project that will be shared. The research will incorporate information from all kinds of different sources and technology can even be used to connect students to experts on the topic. Projects students create can be shared within the class, school, or through technology, the world! 

My students last year completed Genius Hour projects, and it was amazing to see how engaged they were. Student choice was a huge motivator and they couldn't wait until Genius Hour time. I know...the biggest roadblock that comes to mind is, "I don't have enough time as it is-how am I going to give students an hour a week to pursue their passions. I get it. However, it isn't as hard as you might think and is something that can be incorporated into elementary, middle and high school environments. It just takes some rethinking on how you use your time in the classroom.

There are many articles and resources out there about Genius Hour that can say it much better than I can. I encourage you to think about how you might be able to incorporate Genius Hour into your classroom. Your students will thank you! 

Here are a few links to get you started:


On Twitter, search #geniushour

Tuesday, May 3, 2016

3d Printing Math Style

180 - 160 = 20 days of school left

That is 20/180, 

which can tell us that we have 
1/9th of the school year ahead of us
to try some 3d printing.


The only variable that we have to account for yet is... YOU!

The world of 3d printing is complex and many waters are uncharted for core subject teachers.  However, this doesn't mean we cannot get our feet wet with a few simple ideas.

Idea #1: Math teacher is teaching formulas to calculate surface area & volume.
- Have the students each create a cube on Tinkercad.  (quick and easy activity)
- Choose a few students to have their cubes printed.
    * or alternately have a tech coach print you some samples.
- Use these cubes to measure and solve for area and volume.
- Have groups get together with the various cubes and compare the dimensions.

Idea #2:  Print a visual parabola manipulative to demonstrate slope. 
- Print this Parabola manipulative to demonstrate slope in Algebra class.


The .stl file that your tech coaches can print for you can be found here.

Idea #3: Print manipulatives for a visual presentation for fractions.
- Many ready-to-print manipulatives can be printed by your tech coach for use in your classroom.
- Find manipulatives that you wish you had more of.  Contact a tech coach to see if we can print them for you here.


Other thoughts: 


  • The end of the year is a great time to have students express their knowledge with a comprehensive project.  If you have a tech-savvy student who can go above and beyond the call of duty, use him as your guinea pig for the incorporation of new tech, such as 3d printing in your classroom.  Use a project you already have, and have him take it one step further using a design software like Tinkercad.


  • If you are looking for premade lessons / projects Autodesk ProjectIgnite is free and links straight into your Google Classroom.  The lessons are easy to follow can be used from Elem-High School levels.  Sign up for free and search the projects.  Eventually you as a teacher can create a lesson that your students can follow to make their own 3d printable files.

  • SMAHS drafting teacher Mr. Rieger has welcomed any pen/paper designs (complete with specs) to be sent to his drafting students.  They will gladly take your students' ideas and create a printable file with them.  In no time your students can hold their work in the palm of their hands.

Above all, you as teachers are busy.  Why not let the TechCoaches do the legwork for you?  Have a manipulative you would like printed?  Looking for a premade lesson?  Have a group project that would like to utilize 3d printing?  Let us know!  Tech Coaches aren't just for teachers, we can coach your students as well.

 Please keep in mind that starting small is the best option for exploring your ideas.  3d projects can take hours to print, and do cost money.  (e.g.  Having 30 models that do not have any long-term use or value is not ideal.)  Projects in groups and projects that bear continued use over time are encouraged.


You can Google many ready-made 3d printing files to gather ideas.  Here are some sites worth browsing:

www.thingiverse.com
www.yeggi.com

28 other sites can be found here.


Tuesday, April 26, 2016

Quizlet Live

How to use Quizlet Live...


What is this new game?

This is an in-class, team-based learning game based on any Quizlet study set. Students are randomly paired into teams of 3-4 students to race against other teams. Each team must work together to clear their board, and the first team to do so wins.


Who can use this game?

All teachers on Quizlet can use the game for FREE. Students will not be able to play this game on their own, however.


How does the game work?

Here is what to expect:
  • Students work together in randomized teams of 3-4, on ipads or computers.
  • Teams race to match all the terms and definitions but wrong answers reset progress to zero.
  • The first team to match all 12 terms correctly in a row wins.
  • At the end of a game, see what terms students get right and wrong.


To get started you’ll need:

Here's what you'll need to run a successful game.
  • A Quizlet study set (with at least 12 terms)
  • At least 6 students (there is no upper limit on the number of students but we’ve tested with 12-40 students at a time)
  • A computer, ipad, or phone for each student
  • 10-20 minutes of class time


How to set up a game in your class:

Teacher Instructions:
1) Set up your computer to project your screen to the class
2) Give each student a computer or ipad
3) On your computer, go to the set you’d like to use on Quizlet
4) You’ll see a “Live” button on the right side of the page with a “beta” label. Click it!
5) On this screen, click "Create game."
Student Instructions:
1) Students go to http://quizlet.live and enter the game pin you are projecting on your screen (if you cannot access quizlet.live due to school filters, you can access it via https://quizlet.com/live)
2) When all students have joined, preview randomized team assignments (with the option to reshuffle)
3) Assign these teams to students by clicking Use These Teams
4) Ask students to move next to each other so that they can work together
5) Start the game!


Things to Keep in Mind:

Unique Terms:
Requires that there be 12 unique terms in your Quizlet set before starting a game. So, if a set that has the same term OR the same definition repeated, all of those pairs are removed.

Check out the video below or click on this link: Quizlet Video